UX Director
Project Overview
Product: Virtual Battlespace 4
Company: Bohemia Interactive Simulations
Industry: Military Simulation Training
Role: UX Director
Timeframe: 2 years
Platform: PC console, VR, AR
Taking a 13 year old product to a modern design
One of the largest design Challenges at Bohemia was the task of redesigning Virtual battlespace 3 to the next iteration of the product line. This meant overhauling design elements and finding out missing features that were requested by customers not only in VBS3 but in our subsequent product suite.

The overarching concern was that it was a technology that hadn't improved in over a decade. The design was outdated and primarily driven by programmers. Historically the company didn't have any ui or ux designers and all of the interfaces and general ux were slapped together with little to no planning or research.
The end result was a scattered product with varying approaches to design and its user experience.The first step was to collect the key stakeholders in the company and distill the internal requirements of what they wanted VBS4 to be and then reach out to customers to see what their requirements were too.
As can be clearly seen the previous version of the product was create in the early 2000's and hasn't been iterated on in decades. The company didn't have ux designor ui design at the time so all the interfaces were made by programmers and was often clunky and confusing.
UX Design stage 1: Research
Requirements gathering - Finding out what we need to design
Internally I sent out surveys, did interviews and scheduled group design discussions with key stakeholders in the company. This list of attendees included tech leads, team leads, Product owners, and executive level product management to collect their feedback about the companies internal needs for the next iteration of our product.


End User Surveys
In military simulations getting access to end users can be a real challenge due to the very nature of the military. The simulation centers and military bases that they are in have very high security and getting access to a group of military personnel is not an easy thing.
On multiple occasions however I was able to visit numerous such places and get a user survey in front of rooms of military personnel involved with simulations training and using our product. This not only helped us understand who the end user was but how they used our products and the things that would improve it for them.
Defining User Personas
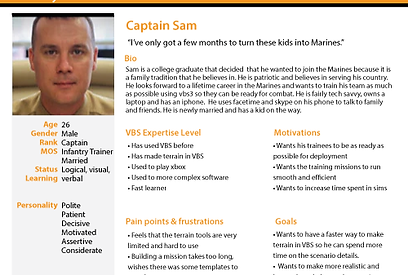
Once we had a clearly defined set of requirements and understand what we are building, we then determine who the types of users are that will be using our product. User personas help us understand what about the user experience neds to change per user type. For example having a user profile allows the system to know to change the ui and options based on the needs of the user type.
As we dug in we found that we had way more user personas at play than we realized. Each sub product has a series of specific users and we have seen up 20 different types in all.
In an effort to streamline the process however we have distilled it down to 4 main types. Trainee, Commander and Instructor and Sim Center System Administrators.
Defining Use Cases
Having a firm understanding of who is using the product coupled with the requirments then gives way to creating use cases. A use case is a detailed description of the actions a user takes to accomplish their specific goal when using a product. Often a single product wil have multiple use cases per type of user. While it can be time consuming to document all of the possible use cases for a product, its good to at least define the main use cases that the average user will encounter and plan for those.


UX Design stage 2: Ideation

Mapping out our understanding of the Product
Once we have all the requirements and the basic use cases defined we moved to the Ideation stage and started working on product diagrams, and user flow diagrams. As is often the case by simply diagramming out what we think we are going to build, we find discrepancies in product vision across stakeholders and team leads.
This results in multiple iterations on the diagrams and an increasing understanding and clarity of what we need to build. Once we are satisfied that we have the correct diagram we share it out with the teams and use it as a benchmark for design discussions.
The user flow diagrams then serve as the blueprint for beginning our wireframes of the software.
Team brainstorming on functionality and usability
Before beginning the wireframes I met with the teams involved in the effort and did a few Team Design Braintorming Sessions to explore ideas for new interfaces and flows. These then become the core of what I use to create the wireframes.
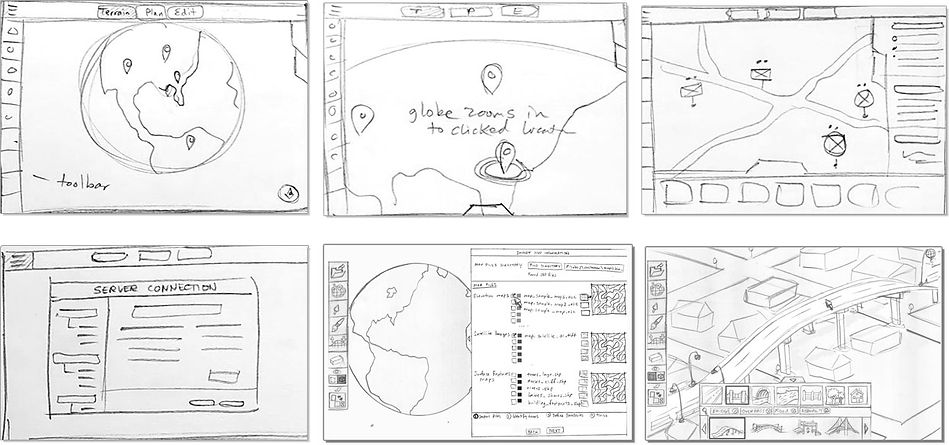
[ Whiteboard notes and design ideas were captured in loose quick sketches and then used as low fidelity prototypes to test the solutions quickly.]
UX Design stage 3: Wireframing
Low Fidelity Exploration
When doing wireframing there is always the tempatation to go straight to fully fleshed out designs but I am a firm believer in keeping designs as simple and low fidelity as long as possible. This helps the design iterations move quicker and people dont get caught up on small visual styling details. Which always happens.
So I do black and white wireframes with blocked out details to flesh out the general flow.


UX Design stage 4: Prototyping
High fidelity prototyping
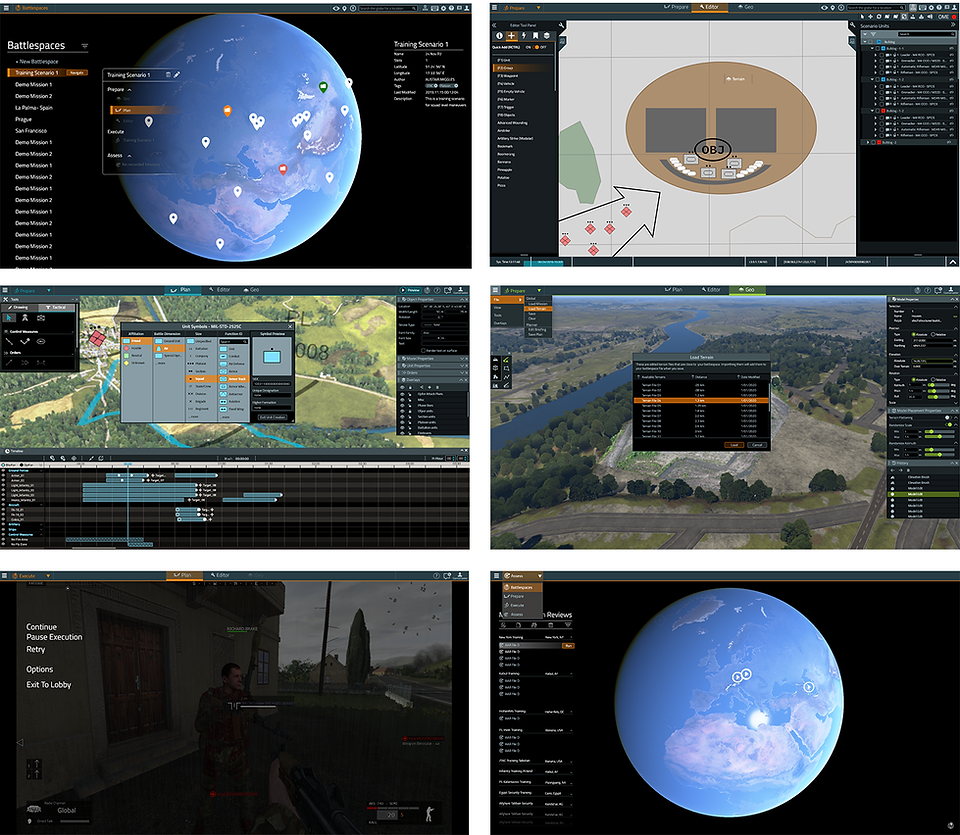
At this stage we are narrowing down the design to a pretty close approximation of the final product. We are still exploring the visual design but have a beginning working ui style. We now see the prototypes getting more and more complex as we are further exposing edge cases in the requirements and use cases and the prototypes become more complex as they represent a full user experience from launch to execute and review.

UX Design stage 5: Final Ui Styling
High fidelity visual design
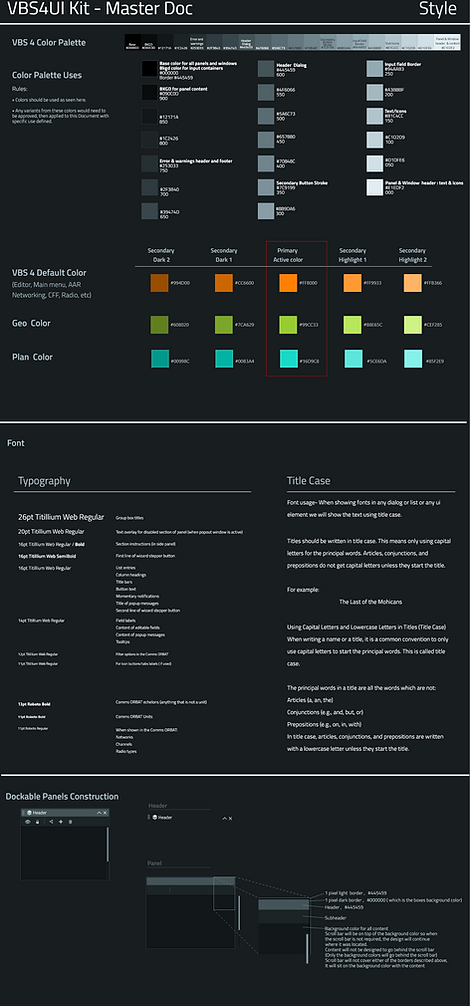
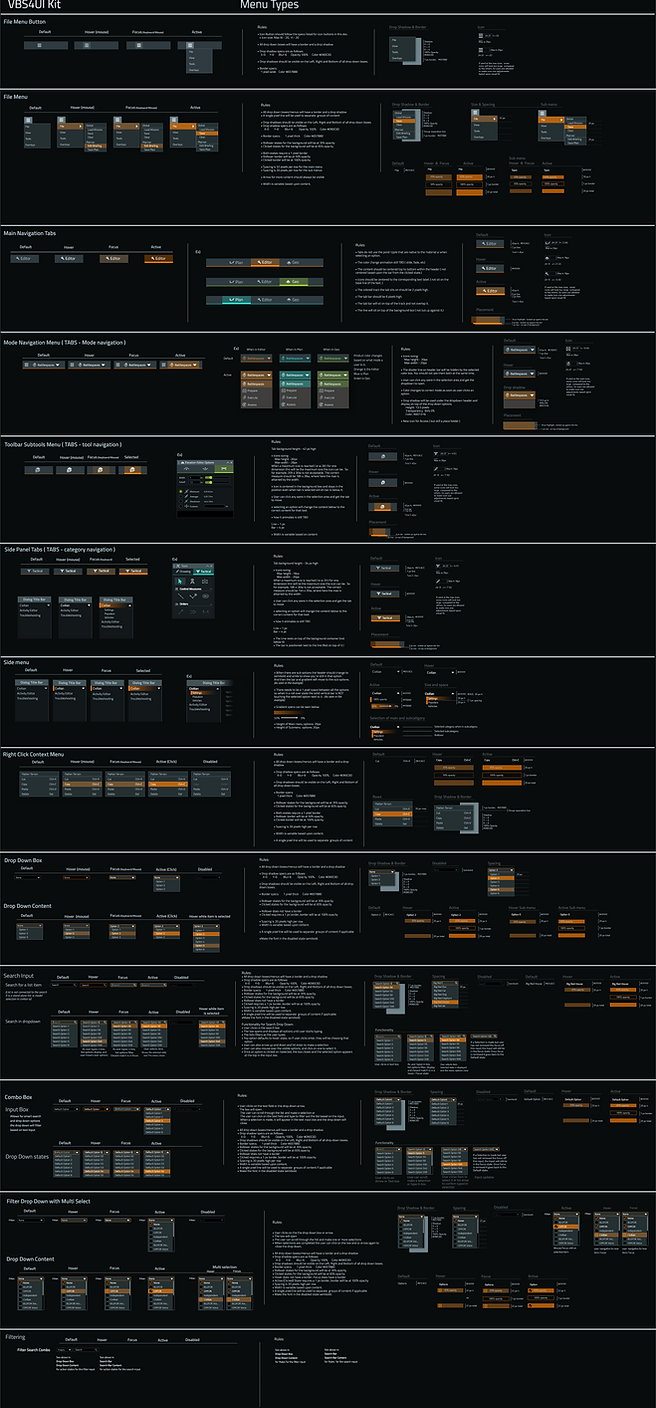
Now that the ux flow is mostly nailed down I move to define the final ui style for the product. The initial step is to define the ui for all the various aspects of the product. For VBS4 we had a multiple apps within the core product and decided to color code them so users could more easily tell what app they were in as each app had a distinct use and unique tool set.
UX Design stage 6: Developing a Style Guide
Developing a Style Guide or Design System
This step can take a long time because the more complex the project is that you are designing for the more details that need to be captured and defined. On this project we have worked closely with the front end developers to also develop a front end library of components that follow the style guide. They then implement the new ui across any new projects which is a very wonderful way to keep consistent with the ux and ui for a product.